Generic Geometry
Extra-geom allows to create a generic detector. It might be useful, for example, for simulation purposes. There are no restrictions on the number of modules or tiles there.
To do this, one need to specify the following parameters:
pixel_size: the size of a pixel in meters (reversed CrystFEL’sres)slow_pixels,fast_pixels: the size of a tile along the slow- and the fast-scan axesss_vec,fs_vec: 3D unit vectors of the slow- and the fast-scan directions in the lab coordinates (the X-axis points to the left, the Y-axis points up, and the Z-axis goes with the beam). Example: np.array([0, 1, 0])corner_coordinates: 3D coordinates of the first pixel of each modulen_tiles_per_module: the number of tiles in each module, default=1tile_gap: the gap between two tiles, default=pixel_sizetile_vec: the direction of tile replication, default=[1, 0, 0], see “One module, several tiles” section below
[1]:
%matplotlib inline
from extra_geom import GenericGeometry
import numpy as np
One module with one tile
The simplest possible config will create a one-tile detector, with the first pixel in the origin, i.e. (0, 0, 0):
[2]:
simple_config = {
    'pixel_size': 0.001,
    'slow_pixels': 64,
    'fast_pixels': 128
}
simple = GenericGeometry.from_simple_description(**simple_config)
simple.inspect();

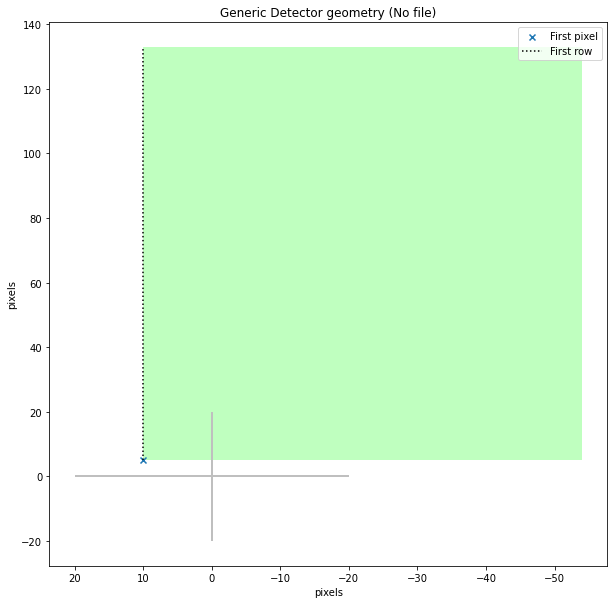
More complicated case is when we set up the corner coordinates and the direction the fast and slow scan axes.
Make sure that these axes are perpendicular.
[3]:
pixel_size = 0.001
simple_config = {
    'pixel_size': pixel_size,
    'slow_pixels': 64,
    'fast_pixels': 128,
    'corner_coordinates': [pixel_size * np.array([10, 5, 0.])],
    'ss_vec': np.array([-1, 0, 0]),
    'fs_vec': np.array([0 , 1, 0]),
}
simple = GenericGeometry.from_simple_description(**simple_config)
simple.inspect();
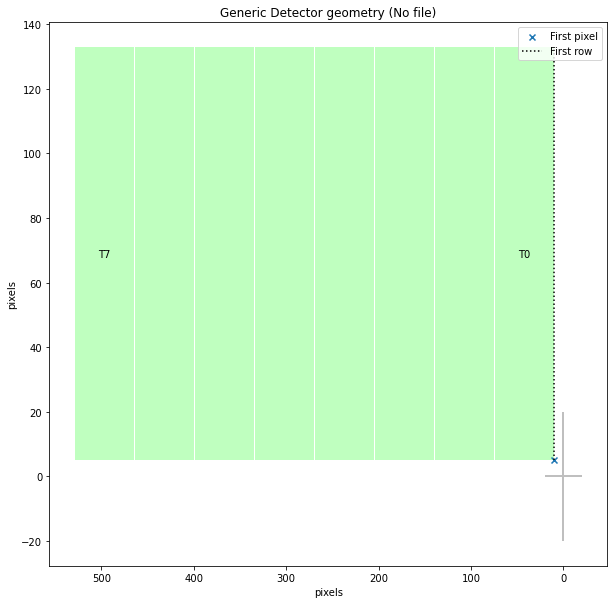
One module, several tiles
The concept of tiles allows to “copy and paste” a tile easily. You just need to set an integer value of n_tiles_per_module (by default it is equal to 1):
[4]:
pixel_size = 0.001
simple_config = {
    'pixel_size': pixel_size,
    'fast_pixels': 128,
    'slow_pixels': 64,
    'corner_coordinates': [pixel_size * np.array([10, 5, 0.])],
    'n_tiles_per_module': 8
}
simple = GenericGeometry.from_simple_description(**simple_config)
simple.inspect();
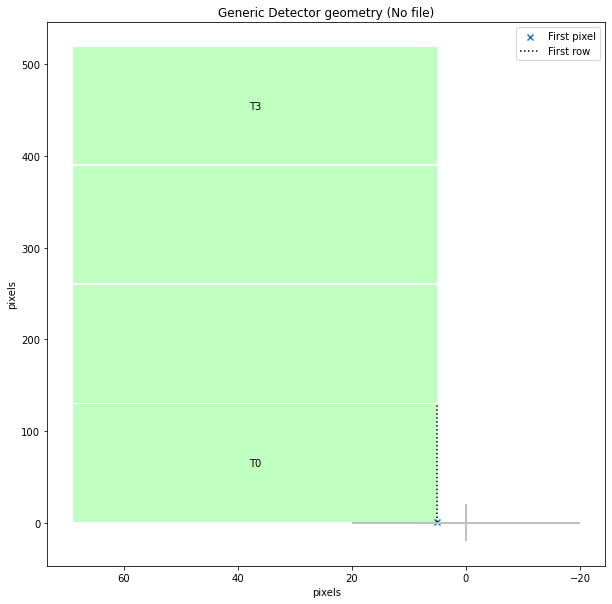
By default, the gap between two tiles is one pixel size but one can adjust it via tile_gap (also in meters). Then, by default, the direction tile replication is the same as slow scan axis ss_vec. However, one can set an arbitrary direction with a vector tile_vec. In the next example, the fast-scan vector fs_vec = (0, 1, 0) is co-directed with the Y-axis, while the tile-replication vector tile_vec = (0, -1, 0) is directed opposite to it. This means that, since Y-axis points
up, every next tile is situated below the previous one:
[5]:
pixel_size = 0.001
simple_config = {
    'pixel_size': pixel_size,
     'slow_pixels': 64,
     'fast_pixels': 128,
     'corner_coordinates': [pixel_size * np.array([5, 1, 0])],
     'n_tiles_per_module': 4,
     'ss_vec': np.array([1, 0, 0]),
     'fs_vec': np.array([0 , 1, 0]),
     'tile_gap': 2 * pixel_size,
     'tile_vec': [0, 1, 0]
}
simple = GenericGeometry.from_simple_description(**simple_config)
simple.inspect();
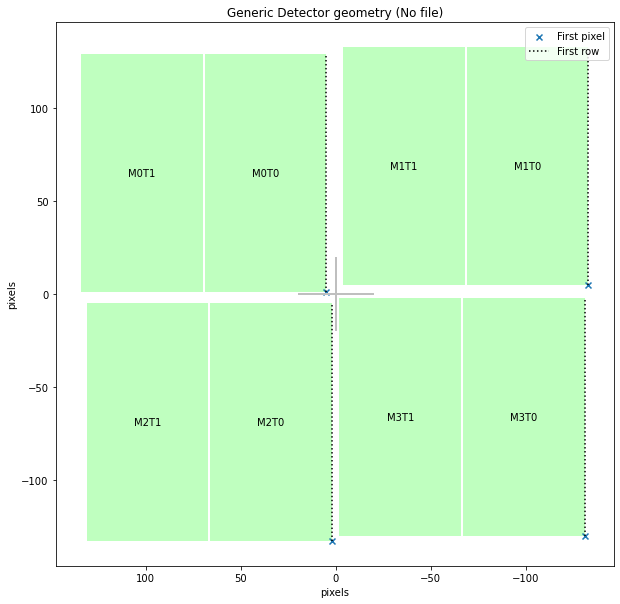
Several modules, many tiles
You can set up several detector modules in one config. In order to do that you simply put as many corner_coordinates as you need:
[6]:
pixel_size = 0.001
simple_config = {
    'pixel_size': pixel_size,
     'slow_pixels': 64,
     'fast_pixels': 128,
     'corner_coordinates': [
         pixel_size * np.array([5, 1, 0]),
         pixel_size * np.array([-133, 5, 0]),
         pixel_size * np.array([2, -133, 0]),
         pixel_size * np.array([-131, -130, 0])
     ],
     'n_tiles_per_module': 2,
     'ss_vec': np.array([1, 0, 0]),
     'fs_vec': np.array([0 , 1, 0]),
}
simple = GenericGeometry.from_simple_description(**simple_config)
simple.inspect();
The code above creates a geometry object for a generic detector. See these examples for how to use a geometry object: